Sunday, October 31, 2010

Spicie Foodie - Your Best Recipes - October's Roundup


Nancy of "Spicie Foodie" has just started an excellent event called "Your Best Recipes." Each month, she compiles a roundup of the best dishes that were made in that month by various food bloggers. I submitted my recipe for pumpkin blondies which I loved. The best part is, that anyone can get in on the fun. All you have to do is send Nancy your submission before the end of the month.

It's definitely a way to find the best of the best and you're sure to find some yummy ideas for your table. To see October's roundup, click here. And, if you have a desire to have your most mouthwatering creation featured on her blog in November, go here to find out more.

Saturday, October 30, 2010

Pumpkin Pie Bars (aka Pumpkin Brownies)

Would you like a slice?

No, it's not pumpkin pie. It's a pumpkin brownie!!!

I love all things pumpkin and love making all sorts of goodies with it. However, while many pumpkin recipes turned out delicious, the perfect pumpkin blondie/brownie still evaded me. Oh, I had tried to make them using one popular recipe, but they lacked both pumpkin flavor and spice and just didn't do it for me. Then, I saw this recipe for pumpkin pie bars on Brown Eyed Baker's blog. Soon after, I saw the same recipe on Steph's Bite by Bite blog. Well, I didn't need any more encouragement. I had to make these bars and try them for myself.

If you're looking for a pumpkin bar with the fudgy texture of a brownie and all the goodness of a pumpkin pie, THIS . . . IS . . . IT!!!


These bars are everything you dreamed about but never thought was possible. They are dense, moist and chewy, packed with the flavors of both pumpkin and spice, and they even have a slightly gooey, cinnamony, caramelized top.


I think I've died and gone to pumpkin heaven. A friend of mine made these on the very same day I did and said that they were excellent with cream cheese frosting. I'm thinking cinnamon cream cheese frosting might be a good idea too. But, any way you slice it, plain or frosted, these pumpkin pie bars/brownies will knock your socks off. What are you waiting for? Go and make a batch of these now. They're so worth it.

Pumpkin Pie Bars (or Pumpkin Brownies) - Brown Eyed Baker and Bite by Bite

2 c. flour
2 1/2 tsp. cinnamon
1 tsp. ginger
1/4 tsp. nutmeg
1/2 tsp. salt (omit if using salted butter)
1 c. butter, melted
2 c. dark brown sugar (I used light brown)
2 eggs
2 tsp. vanilla
1 can (15 oz.) pumpkin

For the top:
2 Tbsp. sugar
1 tsp. cinnamon

Preheat oven to 350F. Butter a 9x13 pan and line with parchment paper, leaving an overhang on both sides.

In a medium bowl, whisk together the flour, cinnamon, ginger, nutmeg, and salt. Set aside.

In a large bowl, whisk together the sugar and butter. Add the eggs and vanilla and whisk until combined. Add the pumpkin and whisk until thoroughly combined. Add the flour mixture and, using a rubber spatula, gently stir or fold the flour into the pumpkin mixture until just combined.

Scrape the batter into the pan and smooth the top. In a small bowl, stir together the sugar and cinnamon, then sprinkle evenly over the top of the batter. Bake for about 30 min., or until a thin knife inserted into the center has just a few moist crumbs on it. Cool completely and then, using the parchment as handles, lift out of the pan and cut into 24 squares. Store at room temperature in an airtight container.

(I had way too much fun taking pictures of these)

Thursday, October 28, 2010

12 Weeks of Christmas Cookies - Apple Jacks Cookies


I can't believe we're almost halfway through our 12 Weeks of Christmas Cookies. It's gone by so fast and Christmas will be here in no time at all. But, at least I've got lots of new recipes to use for my Christmas goodie bags.

The cookie I picked for this week, however, would probably be more suited to this upcoming Halloween, especially since it has that orange and green color scheme down. I present to you, Apple Jacks Cookies.


I've always loved eating Apple Jacks cereal even though, as its commercial once stated, they don't really taste like apples. There's just something about that sweet flavor that I can't resist. So, when I came across this cookie that has Apple Jacks cereal mixed in it, I knew I had to make these.


The flavor of the Apple Jacks in these cookies is on the subtle side. The recipe says to crush the cereal coarsely, but if I make these again, I'll probably crush half of it and turn the other half into a powder, just to disperse more of that flavor throughout the entire cookie.

I did find, though, that you'll taste the Apple Jacks flavor more if you freeze these cookies or let them sit for several days. Seriously, what is it about freezing that is bringing out the flavor in some cookie recipes? I'm sure there's some sort of scientific reaction going on. Either that or the colder temperature makes your tastebuds more sensitive somehow. I may not understand it, but if it results in a yummier cookie, that's all I need to know.


I also recommend rolling these in cinnamon-sugar instead of plain sugar. I tried three ways - plain sugar, turbinado sugar, and cinnamon-sugar, and the cinnamon-sugar ones were the clear winners. What can I say? Cinnamon-sugar makes everything better. So, if you just happen to have some extra Apple Jacks cereal lying around the house, you know what you can do with them. No, no, no, not eat them. Make these cookies.

Oh, and heads up. Next week Monday, I will be hosting my very first giveaway. It will be for a $45 CSN gift certificate. CSN has a lot of great stuff, so make sure you check back here so you can enter for a chance to win.


Apple Jacks Cereal Cookies
(adapted from Cooking During Stolen Moments)

1 c. butter or margarine
1 1/2 c. sugar
2 eggs
2 3/4 c. flour
1 Tbsp. baking powder
1/4 tsp. salt (I used margarine and omitted the salt)
3 c. Apple Jacks cereal, coarsely crushed
cinnamon-sugar for rolling

Cream butter or margarine with sugar until creamy. Beat in eggs. Add flour, baking powder, and salt (if using). Beat just until combined. Stir in coarsely crushed cereal. Roll a heaping teaspoon of dough into a ball and roll in cinnamon-sugar. Place on a cookie sheet and bake for 8-10 min. at 400F. (I baked mine at 350F for about 10-15 min.).

Pic of Apple Jacks cereal (taken from Wikimedia Commons)

This recipe is linked to:
Prairie Story's "Recipe Swap Thursdays"

Week 5 Twelve Weeks of Christmas:

Tuesday, October 26, 2010

Pumpkin Blondies (By Accident)


I intended to make pumpkin bread from my mom's recipe. I got all my ingredients together and followed the recipe exactly. Then, with great anticipation, I put my little loaves into the oven to bake. I imagined how it would be to bite into a nice fluffy slice later that afternoon.

When I finally went to check my loaves, I noticed that something was definitely wrong. They hadn't risen like they were supposed to. Upon removing one from its pan and cutting off a slice, I also saw that the bread was very dense. What happened to my fluffy little breads? I ran back to my computer, perused my recipe with great care, and saw that indeed I had done everything right. So, what could have gone wrong? Well, as it turns out, I had copied the recipe wrong, omitting the part about the baking soda. As a result, I didn't put any in and, there you have it, dense little breads (if they could still be called such).

I was about to despair. All that time, effort, and ingredients spent. I was about to throw them into the trash and chalk this up as a failure. Then, I took a taste. Oh my gosh. It still tasted perfect - pumpkiny, spicy, and delicious. This could no longer be called bread. No, rather this inadvertent mistake had transformed them into the most incredible pumpkin blondies - dense, moist, slightly cakey, and full of flavor to the max. In fact, this ranked right up there with the pumpkin pie bars/brownies I had also made that same day (that post to follow later this week).


I was absolutely thrilled. It was definitely a happy accident. As a matter of fact, I may have to make this "mistake" again (totally unintentionally, mind you).


"Mistaken" Pumpkin Blondies


2 c. flour
1/2 tsp. salt
1/2 tsp. baking powder
1 tsp. cloves
1 tsp. cinnamon
1 tsp. nutmeg
2 c. sugar
3/4 c. salted butter or margarine
1 (15 oz.) can pumpkin
2 eggs

Sift all dry ingredients together. Cream butter and sugar and add the eggs. Add the pumpkin. Add flour mixture. Bake at 350F in five mini greased loaf pans for about 30-45 min., or until a toothpick comes out with only a few moist crumbs attached. Alternately, this could also be baked in a greased 9x13 pan for a more blondie-like appearance.

This recipe is linked to:

11th Heaven's Homemaking Haven's "Homemaker Monday"
All the Small Stuff's "Tuesdays at the Table"
Blessed with Grace's "Tempt My Tummy Tuesdays"
A Moderate Life's "Hearth and Soul Hop"
Beauty and Bedlam's "Tasty Tuesday"
A Beautiful Mess's "Tasty Tuesdays"
Dr. Laura's "Tasty Tuesday"
The King's Court IV: "What's Cooking Wednesdays"
ScrapAddict4Sure's "Whatcha Makin' Wednesdays"
Simply Sweet Home's "Friday Favorites"
Designs by Gollum's "Foodie Fridays"
Moms Crazy Cooking Blog Hop Party
Dessert Friday

Friday, October 22, 2010

12 Weeks of Christmas Cookies - Chewy Chocolate Gingerbread Cookies


I love ginger cookies and the spicier the better. It's one of those things I look forward to when December comes around.


However, this time, I decided to move away from my usual ginger cookie and try these instead - Chewy Chocolate Gingerbread Cookies.


I'm sure you've heard of these cookies, seen them on numerous blogs, and read countless rave reviews on them. Well, let me add my voice to all the others - these cookies are a definite must on your cookie platters. They're spicy, chocolatey, and when you bite into them, your teeth encounter a wonderful resistance from the sugar coating before plunging into the chewy depths within.


They're different from normal ginger cookies due to the addition of cocoa powder and chocolate chips.


The cocoa powder adds a subtle chocolate flavor to the cookies and won't overpower the spiciness factor.

Then, you have all those wonderful chocolate chips scattered here and there, their flavor blending quite well with the ginger.


These cookies also have the addition of grated fresh ginger. I was worried about all the little fibers from the ginger, but do not fret, they somehow disappear and you won't even notice them.

I do recommend, however, that you let these cookies sit for at least a day before you eat them. I know, it's hard to wait that long. But waiting a day will significantly change your tastebuds' reaction to these cookies from a "meh" to a "WOW." The spices will become more pronounced and you'll be able to taste all that these cookies have to offer. Trust me, they'll still be nice and chewy the next day. What else can I say except, "Martha Stewart, you sure know your Christmas cookies."


Chewy Chocolate Gingerbread Cookies (adapted from Martha Stewart)

7 oz. best-quality semisweet chocolate (I used 1 c. chocolate chips)
1 1/2 c. + 1 Tbsp. all-purpose flour
1 1/4 tsp. ground ginger
1 tsp. cinnamon
1/4 tsp. ground cloves
1/4 tsp. ground nutmeg
1 Tbsp. cocoa powder
1/2 c. unsalted butter (I used margarine)
1 Tbsp. freshly grated ginger
1/2 c. dark-brown sugar, packed
1/2 c. unsulfured molasses
1 tsp. baking soda
1/4 c. granulated sugar (for sprinkling)

Chop chocolate into 1/4" chunks; set aside. In a medium bowl, sift together flour, ground ginger, cinnamon, cloves, nutmeg, and cocoa.

Cream the butter and grated ginger. Add the brown sugar and beat until combined. Add molasses; beat until combined.

In a small bowl, dissolve baking soda in 1 1/2 tsp. boiling water. Stir into the butter mixture. Add the flour mixture. Cover the bowl with plastic wrap and chill until firm, at least 2 hours.

Preheat oven to 325F. Roll the dough into balls, roll the balls in the 1/4 c. sugar, and place on a lined baking sheet. Bake about 18 min. until surfaces crack slightly.

Notes:
  1. Martha Stewart's website says that you should chill the balls of dough before rolling them in sugar. I skipped this step and it didn't seem to affect the cookies at all.
  2. I also flattened mine slightly since I noticed that I had baking globes instead of round cookies in my oven.
  3. Somehow or other, I also made a mistake and only added 1/4 c. molasses instead of 1/2 cup, and yet the cookies are still delicious and soft. So, I guess this recipe is a little forgiving, though I'll now have to go and try it as it's written to see if that really does make a difference.
Week 4 Twelve Weeks of Christmas:


Wednesday, October 20, 2010

Cabbage Soup


I used to watch my mother cook when I was a kid. I found out very quickly that she didn't always use recipes. Instead, she would add a pinch of this, a sprinkle of that, and a squirt of something else. Her instruction to me was to pay attention to what she was doing.

Well, I watched, I smelled, I tasted, and yet there's just some things you can't duplicate. Oh, you'll get close and it will taste good, but it just won't taste the same. My mother's spaghetti sauce is one of those things and this cabbage soup is another.

Now, over the years, I've made this recipe, measuring things out just so to try and get it right. At the same time, I've also added in my own flair and adapted my mother's method of throwing in a little of this and a little of that. It's a compromise, the best of both worlds so to speak. While it may not be my mother's, it is still very good.

Cabbage Soup (more or less like my mother's)

3 (8 oz.) cans no-salt added tomato sauce
4 1/2 c. water
2 Tbsp. sugar
garlic powder
squirt of ketchup
splash of Worcestershire sauce
1 Tbsp. all-purpose seasoning (or to taste)
cayenne pepper (to taste)
salt, pepper
6 c. cabbage, thinly sliced

Combine all the ingredients except for the cabbage in a large pot over high heat. Season the soup to your taste. Bring it to a boil, then add in the cabbage. Lower the heat to medium and let the soup simmer for at least 30 min. until the cabbage is cooked through and soft.

This recipe is linked to:
A Prairie Story's "Recipe Swap Thursday"
Vegetarian Foodie Fridays
Family Food Fridays
EKat's Kitchen's "Friday Potluck"
My Sweet and Savory's "Meatless Mondays"

Sunday, October 17, 2010

Peach Jam Spirals


They say, "When life gives you lemons, make lemonade." I say, "When life gives you jam, make jam spiral cookies." I confess that I don't know anything about canning. So, after making a batch of peach jam, I realized there would be no way to keep the jam from going bad before I could eat it all up. Or was there? Oh yes there was!!! The answer was clear . . .


Sticky, fruity, crunchy, yummy jam spiral cookies!!!


By itself, the cookie dough doesn't have much flavor, so make sure you use a jam that you like because that is what will dominate the taste and sweetness of your cookie.

The verdict? The cookie portion of the spirals almost reminds me of biscotti after it's been baked once. It's got a little crunch to it, yet the cookie is still toothsome. It's also wonderful to be able to get a little taste of jam in every bite. I would probably increase the sugar in the cookie dough, but other than that, these cookies are a great way to use up your leftover jam. So remember, when life gives you jam, make jam spiral cookies!!!

Note: These cookies also freeze with no trouble at all. The funny thing is, they tasted even better after they had been in the freezer for a while. Interesting, but it works for me.


Jam Spirals (from Cook Almost Anything At Least Once)

250 grams plain flour
½ teaspoon baking powder
125 grams caster sugar
125 grams butter, softened slightly and cubed
2 eggs, lightly whisked
½ teaspoon vanilla extract
Jam - use your favourite

Sift the flour with the baking powder and add to the bowl of a food processor. Add the sugar and briefly process to mix. Add the butter and process until the mixture resembles breadcrumbs.

Whisk the eggs with the vanilla extract and slowly add to the mixture. Process until the dough starts coming together to form a ball.

If you prefer you can do this all by hand.

Turn out onto a board and knead briefly to form a smooth dough - press out to form a thick rectangle (this makes it easier to roll to the right shape). Wrap in plastic and store in the fridge for a few hours to harden slightly.

Roll out onto a sheet of baking paper to form a large rectangle 25cmx35cm.

Spread the jam evenly over the dough. Using the baking paper as a guide, roll the dough from its longest side to form a tight roll. Once the roll is formed, use the baking paper as a guide to form a cover around it, screwing the edges to tighten the roll. Then wrap this in foil and store in the fridge. You'll need to rest it awhile to firm up the dough and make cutting easier.

When it's time to make the cookies, take it out and slice into 1/2" thick cookies. Preheat the oven to 350F and arrange the cookies on a lined cookie sheet. Bake until the cookies are golden, about 15-20 min. Cool on wire trays. Dust with powdered sugar before serving, if desired.

This recipe is linked to:


All That Splatters' "Weekend Blog Showcase"
La Bella Vita's "Seasonal Saturdays"
Girli Chef's Hearth n' Soul Hop
All the Small Stuff's "Tuesdays at the Table"
Blessed With Grace's "Tempt My Tummy Tuesdays"
Scrap Addict 4 Sure's "Whatcha Makin' Wednesdays"


Monday, October 11, 2010

Homemade Applesauce

I love apples, all kinds of apples, and I love them in every way, shape, and form - pie, cake, brownies, breads, out of hand, you get the point. But, I confess that sometimes I buy more apples than I can eat. Which was the predicament I found myself in today. Since I don't have anyone else to cook for and no immediate person to give goodies to, I decided against using them in baked goods. Plus, I was craving something healthy. So I decided to make . . . .


APPLESAUCE!!!


This has truly been a year of firsts for me - baking my own bread, making my own jam, and now cooking up a pot of applesauce. It's been a wonderful and fun learning experience. Not to mention, it'll do wonders for my food storage someday.

I used gala and fuji apples, since that's what I had in my fridge. But, I would imagine that any type of cooking apple would work in this recipe. I also omitted the sugar since I prefer my applesauce as natural as possible. Trust me, you really don't need it. Spices, on the other hand, are a must for me. I added in some cinnamon, a dash of ginger, and a little cardamom.

I was amazed by how quickly the applesauce came together. In less than half an hour, I had this beautiful bowlful of applesauce all ready for snacking.


Oh yum. Goodbye store-bought applesauce.


Sarah's Applesauce (adapted from Allrecipes)

4 apples - peeled, cored and chopped
3/4 c. water
1/4 c. sugar (I omitted this)
1/2 tsp. ground cinnamon
dash of ginger and cardamom (optional)

In a saucepan, combine apples, water, sugar, and cinnamon. Cover and cook over medium heat for 15-20 min., or until apples are soft. Allow to cool, then mash with a fork or potato masher.


This recipe is linked to:

A Moderate Life's "Hearth 'n Soul Hop"
My Sweet and Savory's "My Meatless Mondays"
All the Small Stuff's "Tuesdays at the Table"
Dr. Laura's Tasty Tuesday

Chocolate Peanut Butter Criss-Crosses


Growing up, I loved Reeses Peanut Butter Cups. There's just something about the chocolate peanut butter combo that totally rocks. So, upon seeing Dorie Greenspan's recipe for Chocolate Peanut Butter Criss-Crosses, I just knew that I had to make them as a nod to my childhood candy fave.

The finished cookies will be either soft and chewy or crispy depending on how long you baked them. As for the taste, both the chocolate and the peanut butter flavors are somewhat subtle, but you can still tell that they're there. The peanuts add a good crunch, and of course, who can resist little bits of chocolate. While they'll never come close to my PB Cups, they're still a good cookie nevertheless.


Chocolate Peanut Butter Criss-Crosses
(from Dorie Greenspan's Baking From My Home to Yours)

2 c. flour
1/2 c. unsweetened cocoa powder
1 tsp. baking soda
1/2 tsp. baking powder
1/4 tsp. salt
pinch grated nutmeg (I omitted this)
1 c. unsalted butter, at room temperature
1 c. peanut butter (I used crunchy)
1 c. light brown sugar
3/4 c. sugar
2 eggs
1 c. chopped, salted peanuts (optional)
1/3 c. chocolate chips (or more)

Whisk together the flour, baking soda, baking powder, salt, and nutmeg. Beat the butter until smooth and creamy. Add the peanut butter and beat for another minute. Add the sugars and beat for 3 min. more. Add the eggs one at a time, beating for 1 min. after each addition. Scrape down the sides and the bottom of the bowl and, on low speed, add the dry ingredients, mixing only until they just disappear. Mix in the chopped peanuts and chocolate chips.

Roll the dough into balls and coat them in some sugar. Place on a baking sheet. Dip the tines of a fork in sugar and press the tines against each ball first in one direction and then in a perpendicular direction - you should have a flattened round of dough with crisscross indentations.

Bake for about 12 min., rotating the sheets from top to bottom and front to back at the midway point. When done, the cookies will still be a little soft. Let the cookies sit on the sheets for a minute before transferring them to cooling racks. Cool to room temperature.

Thursday, October 7, 2010

12 Weeks of Christmas Cookies #2 - Cinnamon Cornflake Cookies


Have you ever seen a box of Cinnamon Cornflakes? It looks like this:


(pic taken from Kellogg's website)

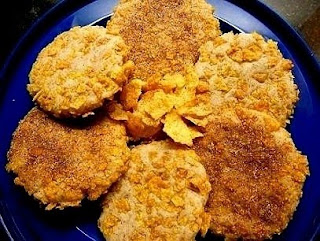
I found a box of these at Wal-mart and just had to try them. They were pretty good and, as I ate them, I felt inspired to go forth and create a new cookie recipe - Cinnamon Cornflake Cookies.

(click on the pic for a better view)

Having grown up in Hawaii, I've eaten a lot of cornflake cookies in my day. It's an extremely popular recipe that's easy to make and delicious. The cornflakes add just the right touch of sweetness to the outside of the cookie and they also give the cookies a wonderful crunch.

Well, as I ate my Cinnamon Cornflakes, I thought, why not use these in my cornflake cookie recipe? And, since I'm using cinnamon cornflakes, I might as well give the entire cookie a cinnamon makeover while I'm at it.

I started off by adding some cinnamon to the dough itself. Then, I rolled the balls of dough in my cinnamon cornflakes. Finally, I decided to experiment just a little further and sprinkled cinnamon-sugar on top of a few of the cookies. I had no idea if any of this would even work, but since I only made a quarter of the recipe, I figured I had nothing to lose.


I then tasted my creation. The ones without the cinnamon-sugar on them were just okay (prettier, but just okay). But, the ones with the cinnamon-sugar, WOW!!! As I ate them, the taste and texture immediately reminded me of churros. It was incredible and I was so pleased that they turned out so well.


I guess I now need to go and make a full batch of these cookies. Hopefully, these cinnamon cornflakes are here to stay because I definitely want these cookies on my Christmas platter.

What? I'm sorry, there aren't any left.
I did say I only made a small batch and they will go fast.

Cinnamon Cornflake Cookies (aka Churro Cookies by Me)

1 cup butter/margarine
3/4 c. sugar
1 tsp. vanilla
2 c. flour
2 tsp. cinnamon
crushed cinnamon cornflakes
2 Tbsp. sugar + 2 tsp. cinnamon (for sprinkling)

Cream the butter with the sugar. Add the vanilla and mix to combine. Add the cinnamon and flour. Roll the dough into 1" balls and roll the balls in the crushed cornflakes. Place them on a baking sheet and flatten (you want the finished cookies to be crispy and they won't flatten on their own). Sprinkle the cookies with cinnamon-sugar. Bake at 350F for 10-12 min. until the tops of the cookies feel firm and dry to the touch.

Note: If you can't find cinnamon cornflakes, don't worry about it. You can still make regular cornflake cookies using plain cornflakes and omitting the cinnamon and cinnamon-sugar sprinkle from the recipe. I assure you, the plain version is also very, very good.

This recipe has been linked to:
Tempt My Tummy Tuesday
A Prairie Story's "Recipe Swap Thursday"

Photobucket

Week 2 Twelve Weeks of Christmas:  

Sunday, October 3, 2010

Sukiyaki

No, I'm not talking about the song. I'm talking about THIS type of sukiyaki:

It's one of my absolute favorite dishes. Not only does it taste good, but it's also very healthy what with all the tofu and vegetables in it. You can even add some sauteed chicken to it if you want. I usually do, but since I didn't have any this time, I went without. Even without the chicken, it's still very, very good.

I wouldn't exactly call this a "quick" dinner. It's quick once you start cooking everything, but the prep work takes a while.

First, you need to chop your carrots and onions. The carrots should be chopped into small matchsticks and the onions into half rings. This insures that they'll cook up quicker.


Then, take your Chinese cabbage (also called won bok) and slice off the bottom stem part. Discard it. Start slicing the cabbage straight down. You'll get large rings that will break up by themselves.


Grab your bag of bean thread noodles. You'll need to boil them until they turn clear like glass and are no longer hard.


The tofu (on the left) will need to be drained first, then cut into small cubes. You will also need to make the sauce (in the bowl). The sauce is simple, it's just equal parts of soy sauce and sugar. It uses quite a bit of soy sauce, hence the reason why I have a gallon jug of the stuff. I prefer to use the Aloha brand since it's milder than other brands. If you can find it, I recommend using it. However, other brands will work too. If you find that it's too strong for your taste, you can always add a little water to tone it down. Now that all your ingredients are good to go, you can finally start the cooking process. Yay!

First, add your carrots and onions to the pot (you may need to add a little water to help the cooking process along). Cook them until the carrots are just tender.


Once the carrots and onions are done, add the Chinese cabbage and pour in the sauce. My family likes a lot of Chinese cabbage in our sukiyaki, but feel free to add as much or as little as you want. Cover the pot and let it steam until the cabbage cooks down.


After 5 minutes or so, it should look like this. As you can see, it really shrinks.


At this point, you'll add in your bean thread noodles and the tofu. Taste the sauce. If it's too strong, add a little water until it's to your liking. Hang on, it'll only be a little while longer before the dish is finally . . .


DONE!!!!


But, if you can control your hunger even longer, turn off the heat and let it stand for about 30 min. and it'll look like this. The noodles will become thicker and soak up more of the sauce. Trust me, your patience will be rewarded.


The beauty of this dish is that you can adapt it to your liking. Add some chicken or make it vegetarian. Add more of one vegetable if it's your favorite or add more of another. It's totally up to you. I hope you like it as much as I do.

Sukiyaki

2 lbs. boneless, skinless chicken thighs (optional)
3 carrots, sliced into small matchsticks
1-2 round yellow onions, sliced into half rings
green onions, chopped
mushrooms, sliced (optional)
1 large Chinese cabbage
1 pkg. bean thread noodles
1 (14 oz.) block medium-firm tofu

Sauce:
2 1/2 c. soy sauce
2 1/2 c. sugar

Cut the carrots into small matchsticks. Cut the onions into half rings. Discard the bottom stem portion of the Chinese cabbage and start slicing the cabbage width-wise. Boil the bean thread noodles until they turn clear and are no longer hard. Drain and set aside. Drain the tofu, pat it down with paper towels, and cut into small cubes. Combine the ingredients for the sauce in a bowl and whisk till sugar is dissolved.

If using chicken, cut into small pieces and saute in the large pot you're going to use for the sukiyaki. After the chicken is done cooking, add the carrots, onions, and green onions to the chicken in the pot. Add a little water if necessary to keep everything from sticking to the bottom of the pot. Cook until the carrots are just tender, about 5 min.

Add the Chinese cabbage and mushrooms and pour in your sauce. Cook until the Chinese cabbage has wilted and cooked down, about 5-10 min. Add the tofu and bean thread noodles. Taste the sauce. If it's too strong, add a little water until the taste is to your liking. Cook for a few minutes just until everything is heated through. Serve over rice.

This recipe is linked to: Hope Studios' Tutorial Tuesday

Friday, October 1, 2010

12 Weeks of Christmas Cookies #1 - Honey Cookies


I recently received two bottles of honey. However, since I hardly ever eat honey, there they sat forlornly on my shelf. That is, until I found a recipe for Honey Cookies on Anna's Cookie Madness website. This is just the type of recipe that lets the flavor of the honey shine through. I used a regular clover honey, but I imagine that other types of honey would be even better. I also used regular sugar instead of turbinado sugar for rolling since that's what I had, but if you have it, turbinado sugar would be great for adding that nice bit of crunch in every bite.

The cookies are soft and chewy, kind of like a honey version of a sugar cookie. And yes, you can taste the honey in them. It's a very nice flavor, not so strong as to be overpowering. I think they would be even better with the addition of some honey roasted peanuts to give them a salty/sweet taste. A dash of spices would probably be good too. It's definitely a recipe that I intend to play around with in the future. If you're looking for a change from your regular holiday molasses cookie, then I suggest you try these.

(P.S. if you click on the photo, you'll get a much better look at the cookies)

Honey Cookies (from Cookie Madness)

1 1/3 c. oil
2 c. sugar
2 eggs
1/2 c. honey
4 tsp. baking soda
1 tsp. salt
2 tsp. vanilla
4 c. flour
sparkly sugar or Turbinado sugar for rolling

Preheat oven to 375F. Combine sugar, oil, eggs, honey, baking soda, salt, and vanilla. Mix well, then stir in the flour, stirring just until it is mixed in.

Shape the cookies into balls about 3/4-1" in diameter and roll them in sparkly sugar (or Turbinado). Place 2 1/2 inches apart on ungreased or parchment lined cookie sheets and bake for 10-12 min. They should be nicely browned around the edges, crackly and golden.

**This recipe makes a lot of cookies (at least 7 dozen). I made only 1/4 of the recipe and still got 2 dozen.