Showing posts with label pie. Show all posts

Monday, April 20, 2015

Double Decker Chocolate Peanut Butter Pie


When I was in fourth grade, my teacher taught us how to make a peanut butter pie.  It was the first time I had ever eaten one and I thought it was the best thing ever.  Naturally, I asked her for the recipe so I could keep making it again and again.  And I did, at least a couple more times.  But, years passed and the recipe got pushed to the back of my box.  Suddenly, the other day, I found myself thinking about it.  But, I figured I would really kick it up this time.  After all, do you know what's better than a peanut butter pie?  A chocolate peanut butter pie, with more chocolate and peanut butter, and Reeses peanut butter cups for even more chocolatey peanut buttery goodness.  Oh yes!  


So, that's exactly what I did.  I filled a crust with melted chocolate, topped it off with the peanut butter cream cheese layer, then made a layer of chocolate cream cheese on top of that.  Drizzled the pie with chocolate ganache and melted peanut butter, and sprinkled chopped peanut butter cups to finish it off.  The result was smooth, creamy, rich and decadent.  It brought back the memories of that pie from fourth grade and is still one of the best things ever.   


Double Decker Chocolate Peanut Butter Pie

1 baked pie crust
1/2 c. semisweet chocolate chips, melted

Chocolate layer:
4 oz. cream cheese, softened
1/4 c. powdered sugar
3/4 c. bittersweet chocolate chips
3 Tbsp. half-and half
1/2 (8 oz.) container of Cool Whip

Peanut Butter Layer:
4 oz. cream cheese, softened
1/3 c. peanut butter (creamy or crunchy)
1/2 c. powdered sugar
1/4 c. milk
1/2 (8 oz.) container of Cool Whip

For topping:
chocolate ganache
1 Tbsp. peanut butter, microwaved for 30 seconds
5 mini Reeses peanut butter cups, chopped

Bake the pie crust as directed.  Melt the 1/2 cup of chocolate chips and spread into the baked pie crust, on the bottom and sides.  

For the chocolate layer:
Combine the chocolate and half-and-half in a microwave-safe bowl and heat in the microwave, on 50% powder, for 1 minute.  Stir together until well combined.  Reserve 1/4 cup of the ganache.

Beat the cream cheese with the powdered sugar, and then beat in the rest of the chocolate ganache.  Fold in the Cool Whip. 

For the peanut butter layer:
Beat the cream cheese, peanut butter, powdered sugar, and milk until smooth and well combined.  Fold in the Cool Whip.  

For the assembly:
Spread the peanut butter mixture evenly in the crust.  Spread the chocolate mixture evenly on top of the peanut butter layer.  Drizzle with the reserved ganache and melted peanut butter.  Sprinkle with the chopped peanut butter cups.  Chill in the fridge for 4 hours before serving. 


 Chocolate cream cheese layer from Chocolate Chocolate and More

Tuesday, April 7, 2015

Chocolate Coconut Macadamia Nut Cream Pie


Apparently, I've been on a pie kick lately.  Which doesn't usually happen because I'm not a pie person.  I'm much more of a cookie/cake person.  But, my sister on the other hand, looooves pie.  Put something into a pie crust and she'll devour it in no time.  So, after making that Caramel Brownie Toffee Cheesecake Pie, it got me thinking, what kind of pie should I make next?  Chocolate, peanut butter, lemon?  So many choices!  But, I've had this recipe for Coconut Cream Pie bookmarked for like, forever, and I finally decided it was high time I made it.


What I like about this recipe is that the filling is made completely from scratch and not a pudding mix.  Of course, that means it's going to be quite a bit more, shall we say, calorie-laden, what with the use of coconut milk and half-and-half.  Not to mention the fact that it called for a whipped cream topping made with, well, heavy cream, naturally.  I was sorely tempted to go all the way with this one, but I just couldn't do it.  So, I lightened things up by using light coconut milk and a fat-free Cool Whip topping (I know, the "fake" stuff, forgive me).  That said, however, I apparently had no problem with adding some of those calories back in by putting melted chocolate and macadamia nuts onto the crust.  You pick your battles.  :)


The result was a pie that was a dream come true.  The contrast of the dark chocolate against the slightly sweeter filling, as well as the smooth, velvety feeling of the cream on your tongue contrasting with the change in texture added by the toasted coconut in it.  This pie might have been lightened up, but it was by no means lacking.  In fact, it was so good, I'm making another one again this week.  Oh and as a sidenote, I also loved it frozen (but that's just me). 

Chocolate Coconut Macadamia Nut Cream Pie (adapted from Favorite Family Recipes)

1 (9-inch) pie shell, baked
1 1/2 c. half and half
1 1/2 c. coconut milk (I used lite)
2 eggs
3/4 c. sugar
1/3 c. cornstarch
1/4 tsp. salt
1 tsp. vanilla extract
1 c. flaked coconut, toasted 

1/2 c. semisweet chocolate chips
1/3 c. chopped macadamia nuts

 Cool Whip (8 oz. tub)

Melt the chocolate chips in the microwave at 50% power for 2 minutes, or until smooth.  Spread on the bottom and sides of the baked pie shell.  Sprinkle half of the macadamia nuts onto the chocolate.

Combine the half and half, coconut milk, eggs, sugar, cornstarch, salt, and vanilla in a saucepan and keep whisking, over low heat, until it boils.  Keep cooking and whisking until the mixture thickens up to look like pudding, about 15-20 minutes.  Remove from the heat.  Add 3/4 c. toasted coconut and the vanilla extract.  Pour into the pie crust and chill 2-4 hours.

Once it has chilled, top with the Cool Whip.  Sprinkle on the remaining toasted coconut and macadamia nuts.  Drizzle with more melted chocolate, if desired. 


Thursday, March 22, 2012

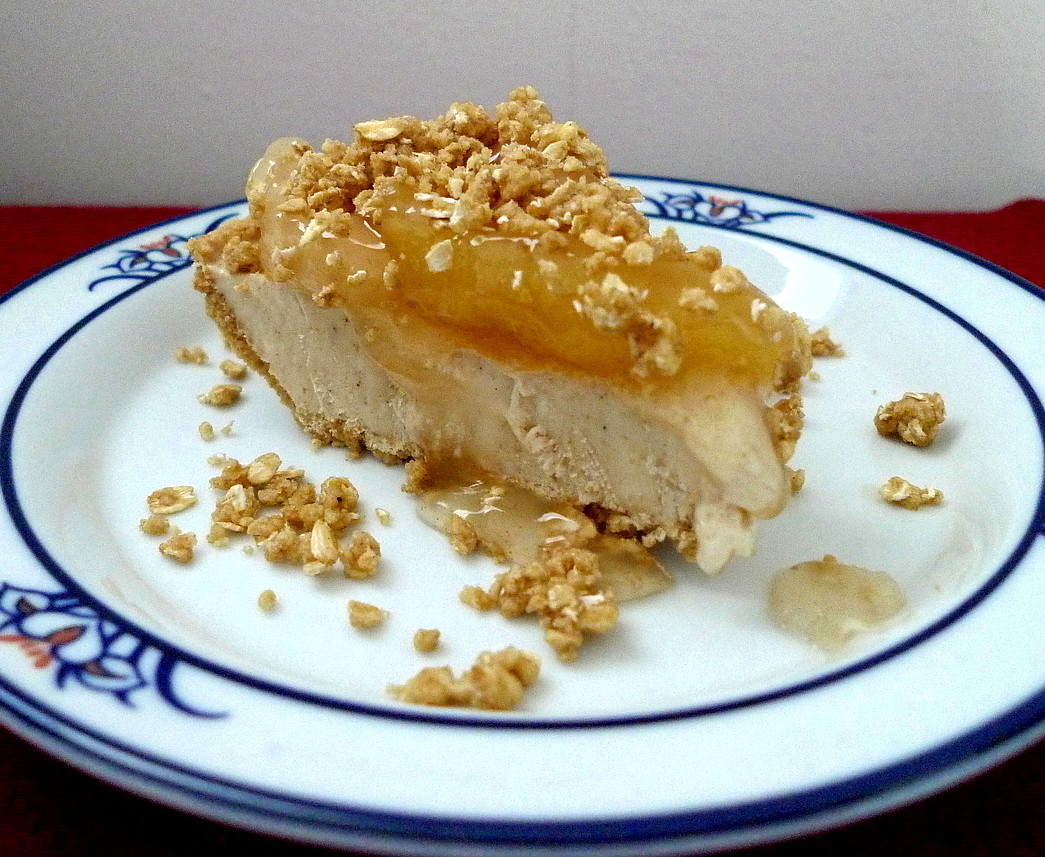
Apple Chai Cream Cheese Pie


When I was younger, my mom had this recipe for blueberry cream cheese pie that I absolutely loved. It was my all-time favorite. It was a no-bake pie so the filling was one deliciously creamy bite after another. Well, I decided to take that pie and completely revamp it into something totally new. So, here's what I did.

First you all know how much I love the flavor of chai spice. So, I decided to incorporate those spices into my cream cheese filling and then use those flavors to lead the rest of the recipe. As a result, I also cut the amount of vanilla in half to let the spices shine through. Then, there was the matter of the crust. The original recipe also called for a regular pie crust. But, I didn't feel that it would really match with the chai spices. So, I used a graham cracker pie crust instead (although I think a gingersnap crust would be even better). Now for the topping. Blueberry is nice, but again not quite the pairing I'm looking for this time around. Apple pie filling, on the other hand, well, that's a different story. It goes hand in hand with warm spices. Perfect.


But wait, I'm not done yet. There's always room for a little something special. How about a spiced oat streusel to finish things off? This was really shaping up nicely (in my mind's eye, that is).

Putting it into practice, on the other hand, was a different story. I ran into a little "mishap" along the way. You see, I decided to substitute evaporated milk for the heavy cream that the original recipe called for. I also didn't bother to whip the milk before adding it. That said, I was still rather perplexed when I mixed it all up and found that it was quite liquidy. Funny, I thought, I don't remember it ever looking like this before. I could have sworn that I had made this pie once before with evaporated milk, but well, that was so many years ago that it's possible my memory is not what it once was (I later checked with my mom and turns out I was thinking of a completely different recipe than this one).


I crossed my fingers and put it in the fridge, hoping against hope that it would magically set. It didn't. So, onto Plan B. I stuck it in the freezer. That turned out to be the best idea ever! The filling became almost like a spiced cheesecake ice cream, and you know that's good stuff. Before serving, I topped it off with the apple pie filling, sprinkled on the streusel, and tada! I had myself a frozen Apple Chai Cream Cheese Pie (doesn't that have a nice ring to it). AMAAAZING!!!


This pie is good to the very last bite. You get the cold creaminess of the cheesecake, the soft sweetness of the apple pie filling, and the slight chewy toothsomeness of the streusel and crust to add a little variety in texture. I was so pleased at how it all came out and the others who ate it loved it too. This pie's the apple of my eye!


Frozen Apple Chai Cream Cheese Pie (created by Lisa of Sweet as Sugar Cookies)

graham cracker pie crust (or a gingersnap pie crust)
8 oz. cream cheese (can use 1/3 less fat)
3/4 c. powdered sugar
1/2 tsp. vanilla
1 1/2 tsp. chai spice (recipe below)
1 c. evaporated milk
1 can apple pie filling, chilled

1/4 c. flour
1/4 c. brown sugar
1/4 c. rolled oats
3 Tbsp. butter, chilled
1/2 tsp. cinnamon, or more according to taste (or you could use the extra 1/2 tsp. chai spice)

Lisa's Chai Spice Blend (makes 2 tsp.):

1 tsp. cinnamon
1/2 tsp. ginger powder
1/4 tsp. cardamom
1/4 tsp. allspice

Beat the cream cheese with the powdered sugar. Add the vanilla and chai spice. Mix in the evaporated milk. Pour into the pie crust. Put in the freezer and let freeze.

For the streusel: Combine the flour with the brown sugar, oats, and cinnamon (or chai spice if using). Cut in the chilled butter until you have pea-sized bits.

Just before serving, top with the chilled apple pie filling. Sprinkle the streusel onto the pie filling. You can let the pie thaw a little before serving if you prefer.

Note: If you really feel extravagant, you could probably even drizzle this with some caramel ice cream topping.

Linked up to:

Bake with Bizzy
A Little Birdie Told Me
Full Plate Thursday
Crazy Sweet Tuesday

Thursday, June 30, 2011

Pineapple Cream Pie


Once upon a time, long long ago, my mother used to bake. My sisters and I would go off to school and, upon returning home, we would find a delicious homemade treat for our afternoon snack. We never knew what she would make next. It could be cookies, brownies, a cake covered with frosting and sprinkles, or even a pie. One particular pie she made was a Pineapple Cream Pie and it was my dad's favorite.


Over the years, she stopped making it. Still, my dad continued to dream about the day when that pie would once again grace our table with its presence. Lucky for him, I inherited the baking gene and decided that I would try my hand at it.

The pie is fairly simple to make. It starts with a thick vanilla pastry cream to which you add crushed pineapple. Then, you pour it into a baked pie shell and chill it before covering it with a mound of whipped cream (or meringue if you choose).


When my dad got home from work, his eyes lit up to see such a rare treat. He promptly cut himself a big piece, ate it, then proceeded to cut himself a second piece. That's definitely a compliment to how good it tasted. I sneaked a couple bites too and it was just as I remembered it. Unfortunately, since I don't get to come home too often, it'll be a while before my dad gets to enjoy his favorite pie again. But, at least for now, he can savor this one.

Pineapple Cream Pie

1/2 c. sugar
1/2 tsp. salt
3 Tbsp. cornstarch
1 Tbsp. flour
2 1/2 c. milk (I used skim milk)
3 egg yolks
1 Tbsp. butter
1 tsp. vanilla
1 c. crushed pineapple, well drained
9-in. baked pie shell

Whisk together the milk, sugar, salt, and egg yolks in a large saucepan. Whisk in the cornstarch and flour until no lumps remain. Bring to a boil over medium heat, stirring constantly. The mixture will thicken. Once it begins to boil, keep it on the heat for 1 min. more, stirring all the while. Remove from the heat and stir in the butter and vanilla. Stir in the crushed pineapple and pour into the baked pie shell.

Put in the fridge to chill for several hours. Once it's chilled, top with whipped cream or Cool Whip.

This recipe is linked to:
Sweet Tooth Friday
Fat Camp Fridays
Sweet Indulgences Sunday
Meatless Monday

Friday, September 3, 2010

Lemon Meringue Pie and an Accomplishment


I have always wanted to try making a lemon meringue pie, not because it's my favorite, but because it seems like such an accomplishment to be able to make one. After all, there are so many problems inherent in the process - the meringue weeps, the meringue shrinks, the filling is runny, the pie crust burns or is not flaky enough, etc., etc. To tell the truth, the very idea of trying to make one intimidated me. Until I found a recipe on Anna's Cookie Madness website. It was called Fool-proof Lemon Meringue Pie. Well, with a name like that, my worries were over.

I absolutely love Cookie Madness. She makes the most wonderful recipes and always gives insightful notes and tips that are a big help. She even makes multiple recipes for the same treat and then reviews them all at once so you know exactly which one will suit your purposes and likes. After reading her review on this recipe, I decided to follow it exactly as written with the exception of using her Betty Crocker recipe for the meringue, since she said that it doesn't weep like some others. With the perfect recipe chosen, I set myself to the task.

I will admit that it's not a quick process since there are so many steps - making the pie crust, blind baking it, making the filling, and whipping the meringue. But, it is easy to follow. As Anna directed, I made the meringue before making the filling. As you know, meringue takes quite a while to make. Furthermore, the meringue needs to be put immediately onto the filling while the filling is still hot, so as to prevent weeping later on.

At one point, I was worried that the filling wouldn't set since it seemed very liquidy. But, never fear, as soon as it started to bubble, the filling thickened all at once forming a potful of beautiful, translucent, lemony goodness. I then poured the hot filling all at once into my pre-baked crust, slapped on my pre-made meringue, and popped it in the oven. The meringue turned a lovely shade of light brown and then my pie was done.

I was so pleased. The meringue was still spread nicely over the pie - no shrinking. In addition, it hardly wept at all. But, how did it taste, you ask? Delicious. The filling was set and sliced perfectly. The meringue was fluffy and the pie crust was flaky. My family was thrilled. Even I couldn't stop nibbling at it, which really says something since I've never liked lemon meringue pie before in my life. After this, though, this will definitely be my go-to recipe. It's not just fool-proof, it's a success.


Fool-Proof Lemon Meringue Pie
(from Cookie Madness)

Filling:
1 1/4 c. sugar
6 Tbsp. cornstarch
1/8 tsp. salt
1/2 c. cold water
1 Tbsp. grated lemon zest
1/2 c. lemon juice
4 egg yolks
1 Tbsp. butter, room temperature
1 1/2 c. boiling water
Baked 9-inch pie crust

Meringue (from Betty Crocker):
3 egg whites
1/4 tsp. cream of tartar
6 Tbsp. sugar
1/2 tsp. vanilla

For the meringue:
Beat egg whites and cream of tartar with electric mixer on high speed until foamy. Beat in sugar, 1 Tbsp. at a time. Continue beating until stiff and glossy. Do not underbeat. Beat in vanilla.

For the filling:
Combine the sugar, cornstarch, and salt in a saucepan. Whisk in 1/2 c. cold water, lemon zest, and lemon juice, blending thoroughly. Whisk in the egg yolks. Add the butter and whisk in 1 1/2 c. boiling water.

Set pan over medium high heat and stir until mixture boils, about 7 minutes. Reduce heat to medium and stir filling 1 minute more. Pour hot filling into pie crust and top with meringue. Spread meringue to seal it to the edges of the crust to prevent shrinking.

Bake at 350F for 15-20 min. until meringue is light brown. Cool pie for 2 hours. Chill the cooled pie in the refrigerator.